OSPF Forwarding address concept
In Case of OSPF LSA type 5, there is a field in the update "forwarding-address", this field, you will generally see having a value 0.0.0.0 but in some cases, it will be a non-zero IP address. We will discuss this field in this post.
When LSA 5 is generated by ASBR in an area and forwarding address is set to 0.0.0.0 then it means that the other routers will be sending traffic for that particular subnet towards the ASBR which is the originator of this update.
But, if the following conditions are matched the forwarding address will be set to the "next-hop address for the subnet" on ASBR.
- The next-hop interface on ASBR is enabled with the OSPF process and
- The next-hop interface is non-passive and
- The next-hop interface is not running point-to-point OSPF and
- The next-hop interface is not running point-to-multipoint OSPF and
- The next-hop interface address of the ASBR falls in the same subnet that is defined under router OSPF
Any other condition will set the forwarding address to 0.0.0.0
To understand the significance of this architecture we will use following network topology
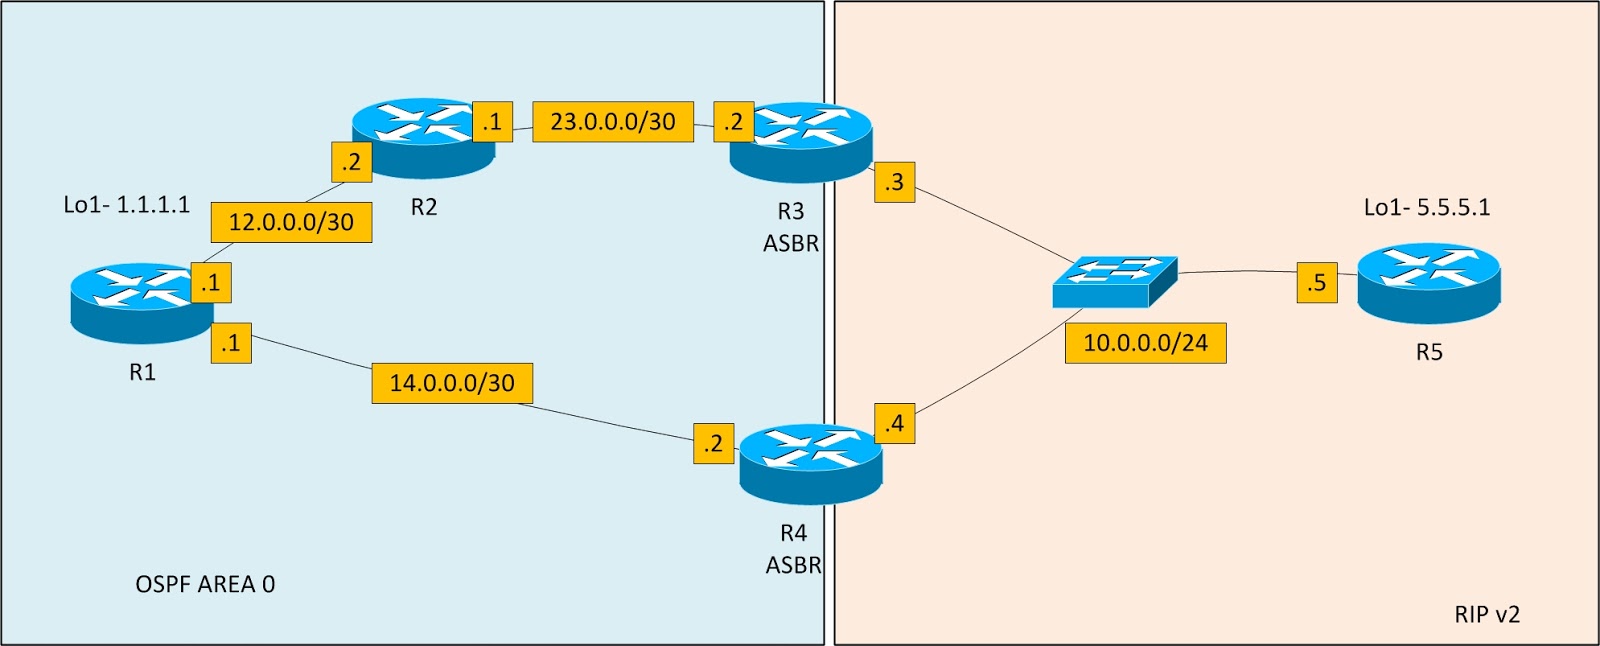
In this topology only ROUTER-3 is performing bi-directional redistribution between OSPF and RIP, so initially from R1 to R5 traffic is following the path R1-R2-R3-R5 and also the forwarding address for the network 5.5.5.1 on R1 can be seen as 0.0.0.0 (show ip ospf database external 5.5.5.1)
Now let us make the conditions favorable for a non-zero forwarding address for LSA-5 (5.5.5.1) by completing the following steps.
- Enable OSPF on R3's RIP side interface(10.0.0.3).
- This will be an OSPF broadcast interface as it is an Ethernet interface.
- The next-hop for subnet 5.5.5.1 lies in the same subnet which is defined under router ospf
If we check on R1 now, the forwarding address for 5.5.5.1 is 10.0.0.5 and R1 will do a recursive lookup and look for the best forward-metric for subnet 10.0.0.5
The traffic will still travel through path R1-R2-R3-R5 because 10.0.0.0/24 subnet is visible to R1 via R3 only.
But if we observe the topology closely, we see that R1-R4-R5 is the best path to make communication between R1 and R5
Let us advertise the 10.0.0.0/24 subnet into OSPF on R4 as well, which will give R1 two options to reach 10.0.0.0/24. It can be seen clearly from topology that R1-R4 is the best path to reach 10.0.0.0/24 subnet and hence R1 gets a lower forward-metric.
Now, 5.5.5.1 network is redistributed by ASBR R1 into the OSPF but the forward metric to the next hop of this subnet (10.0.0.5) is lower from the ASBR R4 so, R1-R4-R5 will be the preferred path for R1-R5 communication.
IOS Configuration LAB basic
LAB Objective : After completing this lab you will know how to access a Cisco Router or Switch with Console port , also you will be introduced to some basic IOS commands.

Devices Used in LAB :
Cisco 2621XM Routers : 1
Cisco 2950T Switch : 1
PC : 3
Estimated Time Required to Solve the LAB : 25 Minutes
Download packet tracer : Download
LAB Highlights :
1. Introduction to console access of Cisco Router and Switch
2. Introduction to different modes of cisco CLI
3. Managing startup configurations, clock and interface level configurations
| $1.99 | Download LAB | $1.99 | Solution soon |
Security and File management LAB basic
LAB Objective : This LAB focus on developing your skills to secure a cisco router with different types of passwords and file management of router such as IOS and startup configuration.

Devices used in LAB :
Cisco 2621XM Routers : 1
Cisco 2950T Switch : 1
PC :2
Server : 1
Estimate time required to solve LAB : 25 minutes
Download packet tracer : Download
LAB highlights : This lab concentrate towards Cisco device security and file management. Following topics will be covered in this lab.
1. Enable password
2. Enable secret
3. Console password
4. Vty password
5. SSH password configuration
6. Breaking console password
| $1.99 | Download LAB | $1.99 | Solution soon |
IP addressing and Subnetting LAB Basic
LAB Objective : This LAB focus on developing your skill to design IP address scheme for a network where you are responsible to avoid wastage of IP addresses.

Devices used in LAB :
Cisco 2621XM Routers : 2
Cisco 2950T Switch : 4
PC : 4
Estimate time required to solve LAB : 25 minutes
Download packet tracer : Download
LAB highlights : You are given the responsibility to design a network for a corporate office having four different departments and these departments are all on different networks so require IP addresses accordingly. Provide the best possible IP address scheme to network with least wastage of IP addresses.
| $1.99 | Download LAB | $1.99 | Solution soon |
Subnetting Practice Labs (VLSM)
Please note that following packet tracer activities should be opend with latest version of packet tracer. You can download the latest version of packet tracer software here :
| Download Packet Tracer Version 6.0.1 |
 |
VLSM Basic Configuration LAB
Understand the Requirements of Network
Subnet the Main network as per requirement
Design the appropriate IP Scheme
Assign IP addresses as per LAB instruction |
| Free | Download LAB | $1 | Download Solution |
 |
VLSM Troubleshooting LAB
Understand the IP address scheme
Verify the ip scheme
Find out the errors
Rectify the configuration |
| Free | Download LAB | $1 | Download Solution |
Subnetting Practice Labs .pkt
Please note that following packet tracer activities should be opend with latest version of packet tracer. You can download the latest version of packet tracer software here :
| Download Packet Tracer Version 6.0.1 |
 |
Subnetting With Static Routes part 1
Understand the Requirements of Given Network
Subnet the main network according to Requirements
Design IP Address Scheme
Configure topology |
| Free | Download LAB | $1 | Download Solution |
 |
Subnetting With Static Routes part 2
Understand the Requirements of Given Network
Subnet the main network according to Requirements
Design IP Address Scheme
Configure topology |
| Free | Download LAB | $1 | Download Solution |
 |
Subnetting LAB 3
Understand the Requirements of Given Network
Subnet the main network according to Requirements
Design IP Address Scheme
Configure topology |
| Free | Download LAB | $1 | Download Solution |
| You may have solved these activities but you can support us by buying a solved activity. This will encourage us to bring new things for you and also keep this website up and working. |
Tag :
Subnetting and VLSM
Packet Tracer LAB - Access control List on Campus Network
You are given the network administrator role in a campus network. Basic Connectivity in the network is complete, you need not to configure any routing.

There are two type of users in campus, Teachers and Students.
Four Services are there in network with four different servers. You have to secure the network by applying access-control-lists on Campus Router to fulfill the following requirements:
There are two type of users in campus, Teachers and Students.
Four Services are there in network with four different servers. You have to secure the network by applying access-control-lists on Campus Router to fulfill the following requirements:
Oracle Virtual Box With Gns3 - Windows XP

Gns3 gives you provision to connect PC with operating system to your network topology, in this way you can perform many important practicals like communication between two hosts running cisco-ip-communicator over voice topologies etc.
so let's get started
following are the software requirements.
1. Gns3 virtual box edition - Download here
2. Oracle virtual box - Download here
3. Operating system - we will use windows xp as operating system
Steps to be followed.
Step 1 . install gns3 virtual box edition and oracle virtual box on your system.
Step 2. Install virtually windows xp in oracle virtual box.
Step 3. Now open Gns3, Click on edit and follow the path
Edit > Preferences > Virtual box

Step 4. In the General settings tab click on the button "test setting" if virtual box is installed properly, successfully started.

Cisco Packet Tracer LAB - 1 Subnetting
You are given a Campus network and Main network; there are
different LABs with different number of host’s requirements. You have to
subnet the main network and assign appropriate IP addresses on different
interfaces of network devices.
Main network
|
Subnet mask
|
192.168.10.0
|
255.255.255.0
|
Location
|
Requirement
|
Assign
|
LAB 1
|
120 Hosts
|
1st subnet after subnetting
|
LAB 2
|
60 Hosts
|
2nd subnet after subnetting
|
LAB 3
|
30 Hosts
|
3rd subnet after subnetting
|
LAB 4
|
10 Hosts
|
4th subnet after subnetting
|
LAB 5
|
10 Hosts
|
5th subnet after subnetting
|
Please note that following packet tracer activities should be opend with latest version of packet tracer. You can download the latest version of packet tracer software here :
| Download Packet Tracer Version 6.0.1 |
.png) |
| Cisco packet tracer lab 1 subnetting Unsolved | Cisco packet tracer lab 1 subnetting Solved |
.png) |
 |
How To Configure PIX firewall on GNS3

Cisco PIX firewall can be simulated on GNS3. You need a PIX firewall image to run it with gns3.
Steps to be followed.
Step 1. Download the following files and save these file in a specific folder.
Binary image
key and serial
PIX will work in GNS3 with Qemu.
Step 2. Open gns3 and on the file menu go to : Edit > Preferences and click on Qemu and then select the PIX tab.

